Before I get into my very first ‘serious’ blog post about making handbags, I wanted to take the opportunity to say how grateful and overwhelmed I am for all the support I’ve received on my venture into blogging! You guys are seriously awesome, thank you so much for coming along on this journey with me into the unknown!

So moving on….my first post. This post is for Vicky, who messaged me last week to ask about sewing machines for bag making. There are many and varied tools you need for bag making but the key one you need is the sewing machine…..
I originally published this post and it was MASSIVE – you seriously needed one, maybe even two cups of coffee, to get through it! So I’ve now broken it up into three, more manageable parts.
PART 1: Sewing Machines for Bag Making… is a great starting point. I talk generally about the different types of machines and what they are called and introduce you to what I use for bag making. This part continues below.
PART 2: What Bag Making Sewing Machine for me?…. picks up on your new basic knowledge of different sewing machines used for bag making. It includes considerations you need to make about which machine is going to suit you, your general sewing goals, space availability and finances….all of which are relevant when deciding on a machine to suit you best. If you are looking for this, please click here.
PART 3: Buying a Bag Making Sewing Machine… having considered and identified what machine suits you and your bag making goals, it’s now time to go and test drive. Part 3 gets you ready to go and test drive, and arms you with things to take with you, what to look for and questions to ask. If you are ready to purchase a machine and are looking for this post, please click here.
So here we are, at the beginning and what are the different machines in bag making. Read on…
BAG MAKING SEWING MACHINES:
CYLINDER ARM
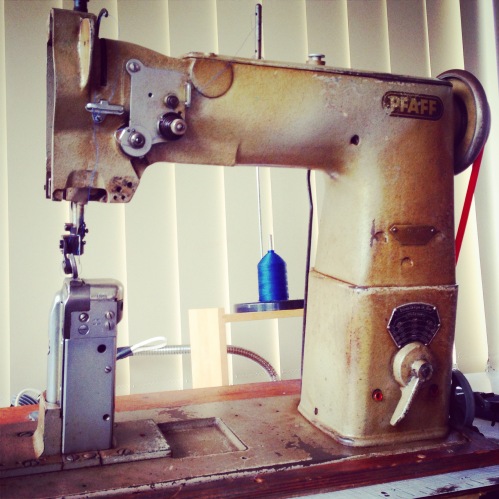
For me, the Cylinder Arm is the most ideal sewing machine you can use for leather bag making. It is industrial machines that go by this name and it’s called at Cylinder Arm because of the cylinder shaped arm that extends out horizontally from the main body of the machine. With a Cylinder Arm, you will also find the needle is positioned right at the very end of the arm. At university in the handbag making rooms, all but a few machines were Cylinder Arms. These are ideal, particularly for making large handbags, with the amount of space available underneath the horizontal arm to manipulate the bag around while sewing. Some Cylinder Arms will also come with part of the table cut out allowing you to sew even larger bags.

My Pfaff 335 Cylinder Arm Machine with Walking Foot, who I call Percy
FLAT BED
As the name suggests, the sewing area of the Flat Bed machine is flat. This machine is typically built into the table so it’s all one flat surface. Larger bags can still be made on this machine but it will need more manipulation, and depending on the type of bag and how they are constructed, some areas you won’t be able to get into with a flatbed. More consideration will need to go into what bags you make and how you make them, in order to do them from beginning to end on a Flat Bed.

Pfaff 135 Flat Bed
POST BED
The last type of sewing machine for bags is a Post Bed. Again this is a name used for industrial machines and it is called this for the single arm that stands upright on the machine like a fence post. Traditionally a Post Bed machine is used in footware manufacture, but they are also very useful in bag making as they can get into some very tight corners that you wouldn’t be able to get into with the Cylinder Arm or Flat Bed. Indeed there are some bag makers that make entire bags with a Post Bed machine and prefer them over other machine types, it’s all a matter of preference.
My Pfaff 191 Post Bed Machine with Roller Foot, affectionately known as Patsy
COMBINATION MACHINES
All of the above machines can be used exclusively for making bags. However, having a combination machine opens up more options in your bag making. The most common combination machine is a Cylinder Arm and a Flat Bed, and there are three ways they can be achieved.
1) The most common way is with a domestic table-top sewing machine. These machines have a flat area, smaller compared to a dedicated Flat Bed machine, but still big enough to hold most sewing projects flat. Then by removing the storage compartment, a ‘free arm’ will be revealed. This arm will be more square, the needle will be position further in on the free arm and the distance between the bottom of the arm and the table will be smaller than a dedicated Cylinder Arm machine….. but with some manipulation, it will still allow you room to manoeuvre larger bags around the machine. An additional table top attachment can also be purchased and added to make a larger flat service for sewing.

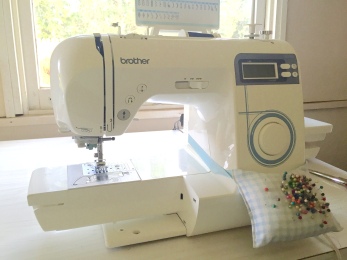

Brother NS30 Domestic Sewing Machine – Flat Bed to Free Arm to table top Extension
2) The next way is to use a specially designed sewing table or sewing cabinet for a table top domestic machine. These sewing tables and cabinets have a lever system, where the machine can be positioned in two locations, therefore making a Flat Bed or a Cylinder Arm equivalent. Locking the lever, where the top of the machine is level with the top of the table, a Flat Bed machine has been made. An extra extensions can also be purchased to close up any gaps between the table and the sewing machine. The machine can also be completely raised so the base of the machine is at table top level, just as it would be if you didn’t have a cabinet and were sewing on the dining room table. Remove the storage compartment to access the free arm and again you will have two machines in one.

A Horn Sewing Cabinet ‘Cub Plus’, in a flat bed position (with extension)

Horn Sewing Cabinet ‘Cub Plus’ in a table top position.
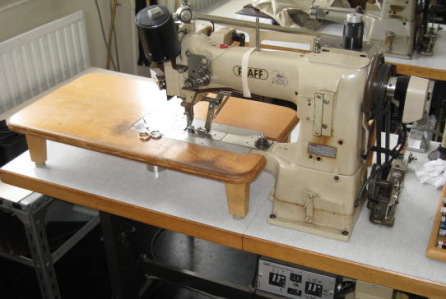
3) Lastly you can convert your industrial Cylinder Arm to a Flat Bed through a table top extension for your Cylinder Arm. This table top will fit around the arm and lock into place, providing you with a large flat work area. With a little bit of searching, you can find this attachment to purchase for your type of machine, or if you are clever enough you can make it yourself.

A purchased Cylinder Arm table top extension
A home-made Cylinder Arm table top extension
SEWING MACHINES I USE
I sew bags combining different leathers and fabrics, and I am fortunate enough to have a dedicated studio for making my bags. My handbag making studio is made up of:
- Industrial Cylinder Arm (Pfaff 335), with a walking foot;
- Industrial Post Bed (Pfaff 191), with a rolling foot;
- Very basic table top domestic machine, (Brother NS30), with flat-bed attachment;
- Domestic overlocker (Brother 3034D).
In addition, I have a leather Skiving Machine in the studio and another domestic Brother NS30 sewing machine that I keep at home for odd jobs. The only machines I purchased new were one of the Brother NS30’s and the overlocker….all the rest were second-hand.
I don’t have an industrial Flat Bed machine. Instead, I have crafted my own table top extension to fit around my Cylinder Arm, converting it to a Flat Bed. I’ve done this with a cardboard box, which is a cheap and very effective option. It’s only now, after having the machine for 10 years, that I’ve had to re-do my cardboard box flat bed extension as the sticky tape gave out!

My cardboard table top Flat Bed extension for my Cylinder Arm Machine
Now in terms of what I use most for bag making, I use my Cylinder Arm (with and without cardboard box extension) 85% of the time, table top domestic 10%, Post Bed 4% and lastly the overlocker 1% of the time. As you can see – a big fan of the Cylinder Arm!
All my leather work is done on either the Cylinder Arm or Post Bed – depending on the design of the bag and which machine is the best fit. I use my domestic machine to make all the bag linings, as the Cylinder Arm and Post Bed would just make a mess of the cottons I use in the linings. The Overlocker is for the linings as well.
And that’s where I’ll cut Part 1 off, with a basic knowledge of the different types of sewing machines used in Bag Making and which machines I use. Part 2 continues after this with what considerations you need to make when purchasing a machine for making handbags.
Until then, have a wonderful day and happy sewing.


Oh Annie. This blog is fantastic. I’m just starting bag making and have your machines. Any advice and help would be most grateful. I am on my own on this tiny island. Isle of Man xxx. Zoe xxx
LikeLiked by 1 person
I’m so excited to have found your blog. Thank you!!
LikeLiked by 1 person
Thanks, Annie. You have great advice. We are in the searching/planning stages of making bags as a serious hobby/business. To date I have made about 30 bags (pretty good quality). I just found a PFAFF 335 Cylinder Arm, following your advice. The dealer, who is interested in selling a different newer machine, says the PFAFF 335 has a smaller bobbin and therefore, I could run into problems with running out of bobbin thread at an inopportune time. He also said it has small stitches (not as pretty for exterior stitches). I haven’t seen a demo yet. Any comments?
LikeLike
Hi Janet, thanks for your comment and feedback on my post. I’ve never had a problem with the bobbin size and this bobbin size is transferable to my other Post Bed machine, which works for me. All bobbins run out, regardless of size, and can do it at an inopportune time. I find if I’m about to do some top stitching that will be visible, I will do a quick check of my bobbin before I start to be sure I have enough.
With regard to stitch length, yes there are other machines that can do very large stitches. The Pfaff 335 goes up to approximately 4mm per stitch. Again I’m quite happy with the stitch length, but there are some bags where the stitching forms part of the main features on the bag. If your bag has other features that are eye-catching, large stitches could detract from that.
If I was deciding on a new machine, bobbin size wouldn’t concern me, but I would give thought to the stitch length and how much of a feature you want it to be on your bags. Keep in mind, if you do go for a machine with larger stitches, to make them really standout you will need a thicker thread and bigger needles.
Good luck with your decision making and your ultimate purchase.
LikeLike
OMG this is amazing blog and yes to the box can I get the dimensions to the box pls you rock my world right now . trying to get extension table and well in oz they don’t exist and with shipping from the US well that’s just ridiculous.
LikeLike
Hi Rachel, thanks for stopping by and YES, totally hearing you on shipping from the US! I think the dimensions may vary depending on the type/brand of cylinder arm machine you have. I will get the measurements of mine when I go to the studio, but for a simple cardboard box ‘extension table’:
1) measure the height from your machine table top to the top edge of your cylinder arm.
2) measure the width from the body of your machine, along your cylinder arm and extending past the end of the cylinder arm by the length you want. I think mine is 20-30cm.
3) measure the depth from the front edge of your machine table to how far you want the ‘extension table’ to be. You might want it the entire depth of your machine table or just 20cm back from the cylinder arm.
Then just get a large enough flat mailing box or moving box (from office works or a packaging company) and start cutting and taping to those dimensions. One end will need to be open. Once made up, I used a sheet of A3 paper to trace around the top profile of the cylinder arm and transferred this to the right position on the box and cut out. I also taped up the edges of the cylinder arm cut out so it doesn’t get tatty sliding it on and off, and so lasts longer.
Good luck and if I don’t get back straight away (juggling lots of projects at the moment), remind me for the dimension of mine 😉
Have a great day
Annie
LikeLike
I’m so much interested in bag making but I don’t know the best machine I will buy.
LikeLike
Thanks Annie, I really find your blog helpful.
LikeLiked by 1 person
Happy I found your informative blog. This has been most helpful. I have made a number of handbags and wallets on my home sewing machine which have turned out very well, but I struggle with manipulating the bags around the throat. I will be searching for the industrial machines you suggest, they seem to offer the best solution for me. Thank you for the time you took write this article!
LikeLiked by 1 person
Helpful information indeed thank you so much.
LikeLike